Intro to real-time bidirectional communications between browsers and webSocket servers
We have been using COMET techniques to implement bidirectional communication between a web browser and web server. Long polling is the most popular technique of achieving bidirectional communication between a web browser and web server because it works without compromising user experience and without any extra server configuration, and it works on all web browsers that support AJAX. Long polling can easily be implemented in any existing HTTP server. But the problem with long polling and other comet techniques is that none of them are suitable for building real- time apps because of HTTP overhead. This means that every time an HTTP request is made, a bunch of headers and cookie data is transferred to the server, which in turn increases the latency, therefore making it unsuitable for creating applications such as multiplayer games, chat apps, social networks, and live score websites, which require bidirectional communication in real time. Therefore, a new protocol called WebSocket was introduced, which was designed to enable bidirectional communication in real time between a web browser and WebSocket server.
In this article, we’ll cover the following:
- An overview of WebSocket
- The relationship between WebSocket and HTTP
- The interaction of WebSocket with proxy servers and firewalls
- Implementing WebSocket using Socket.IO
- The Socket.IO API in depth
- Many other important things related to WebSocket and Socket.IO
Introducing WebSocket
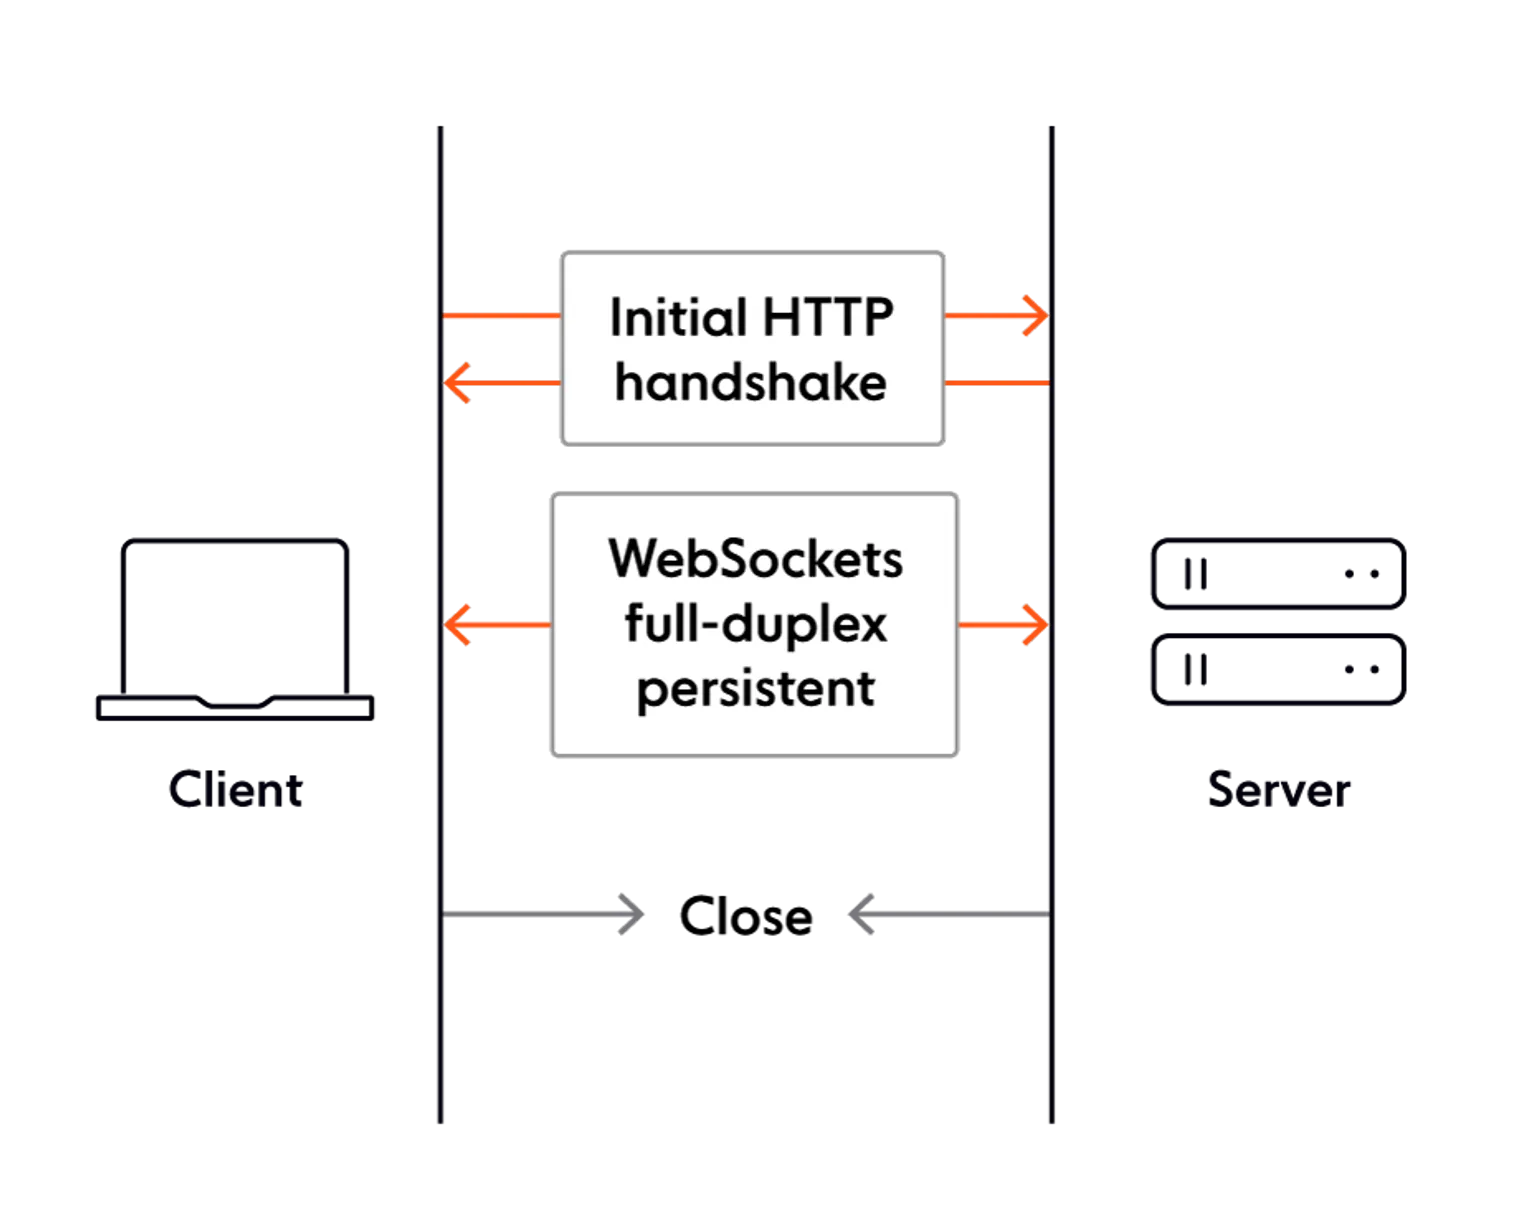
WebSocket is an application-layer protocol designed to facilitate bidirectional (either the client or server can send a message to the other party whenever a message is available) and full-duplex communication (both the client and server can send messages to each other simultaneously) between a web browser and WebSocket server in real time.
WebSocket is a binary protocol; therefore, it is faster than the HTTP protocol, which is a text-based protocol.
WebSocket has gained popularity and is already being used by many websites due to its real-time and full-duplex features. Due to overhead caused by comet techniques, it was not suitable for real-time bidirectional message transfer, and it was also not possible to establish a full-duplex communication system between a web browser and web server using comet. That is, comet techniques let us achieve only half- duplex communication system (only the client or server can send messages to the other party at a given time).
WebSocket is designed to facilitate bidirectional communication between a web browser and WebSocket server, but it can be used by any client. In this article, we will only concentrate on how it’s implemented in a web browser.
The relationship between WebSocket and HTTP
The only relationship between WebSocket and HTTP is that a WebSocket handshake between a web browser and WebSocket server is done using HTTP. Therefore, a WebSocket server is also an HTTP server. Once the handshake is successful, the same TCP connection is used for WebSocket communication, that is, communication switches to the bidirectional binary protocol, which does not conform to the HTTP protocol. The default port number for WebSocket is 80, same as for HTTP.
Although you can implement your own WebSocket handshake mechanism if you are using WebSocket outside a web browser environment, the official WebSocket documentation only states the HTTP handshake mechanism because WebSocket is designed to enable bidirectional communication between web browsers and WebSocket servers.
You can integrate a WebSocket server into your main web server that serves your HTML pages, or you can use a separate web server for WebSocket communication.
Sending and receiving data on a WebSocket connection
Data is transferred through a WebSocket connection as messages, each of which consists of one or more frames containing the data you are sending (called the payload). In order to ensure that the message can be properly reconstructed when it reaches the other party, each frame is prefixed with 4-12 bytes of data about the payload. Using this frame-based messaging system helps reduce the amount of non-payload data that is transferred, leading to significant reductions in latency, therefore making it possible to build real-time components.
We won’t get into the exact data format and other details of the WebSocket handshake, data framing, and sending and receiving data as this is only required if you are planning to create your own WebSocket server. We will use Socket.IO JavaScript library to implement WebSocket in our application, which takes care of all the internal details of WebSocket and provides an easy-to-use API.
WebSocket schemes
WebSocket protocol specifications have introduced two new URL schemes, called ws
and wss.
ws represents an unencrypted connection whereas wss represents an encrypted connection. Encrypted connections use TLS to encrypt messages. So, when making a WebSocket handshake request using HTTP, we need to use ws or wss instead of http or https, respectively.
The interaction of WebSocket with proxy servers, load balancers, and firewalls
The WebSocket protocol is unaware of proxy servers by itself. When a WebSocket connection is established behind a proxy server, the WebSocket connection can fail or work properly, depending on whether the proxy server is transparent or explicit and also whether we have established a secure or unsecure connection.
If the browser is configured to use an explicit proxy server, then it will first issue an HTTP CONNECT method to that proxy server when establishing the WebSocket connection. The CONNECT method is used to tell a proxy to make a connection to another host and simply reply with the content, without attempting to parse or cache it. A browser issues the HTTP CONNECT method regardless of whether the connection is encrypted or unencrypted.
If we are using a transparent proxy server (that is, a proxy server that the web browser is unaware of) and the connection is encrypted, then the browser doesn’t issue an HTTP CONNECT method because it’s unaware of the proxy server. But as the connection is encrypted, the proxy server will most probably let all the encrypted data through, therefore causing no problems to the WebSocket connection.
If we are using a transparent proxy server and the connection is unencrypted, then the browser doesn’t issue an HTTP CONNECT method because it’s unaware of the proxy server. But as the connection is unencrypted, the proxy server is likely to try to cache, parse, or block the data, therefore causing issues for the WebSocket connection. In this case, the proxy server should be upgraded or explicitly configured to support WebSocket connections.
The WebSocket protocol is unaware of load balancers by itself. If you are using a TCP load balancer, it is unlikely to cause any problems for a WebSocket connection. But if you are using an HTTP load balancer, it’s likely to cause problems; therefore, it needs to be upgraded or explicitly configured to handle WebSocket connections.
The WebSocket protocol is unaware of firewalls by itself. Firewalls are unlikely to cause any problems for a WebSocket connection.
The same-origin policy for WebSocket
Browsers as well as WebSocket instances can perform cross-domain communication, that is, they are not restricted by any same-origin policy.
While making an HTTP request for a handshake, the browser sends an Origin header assigned to the webpage origin.
If a WebSocket server wants to restrict communication to a particular domain, it can read the Origin HTTP header of the handshake HTTP request and block or allow the handshake accordingly.
Introduction to Socket.IO
Socket.IO is a combination of the client-side JavaScript library and Node.js library used to integrate bidirectional communication between a browser and Node.js backend.
The Socket.IO client-side library is used to create a Socket.IO client whereas the Socket.IO Node.js library is used to create a Socket.IO server. The Socker.IO client and server can communicate with each other bidirectionally. Socket.IO primarily uses WebSocket to achieve bidirectional communication.
The main reason for using the Socket.IO client-side library instead of using the WebSocket API is that WebSocket is a relatively new protocol at the time of writing and not all browsers support the API. If Socket.IO sees that the browser doesn’t support WebSocket, then it jumps to one of the other mechanisms, such as Flash sockets, long polling, multipart streaming, iframes, or JSONP polling, to implement bidirectional communication between browsers and servers. Therefore, we can say that Socket.IO is guaranteed to work on every browser. The Socket.IO backend library provides APIs to create namespaces and rooms, broadcast messages, and so on, which are very useful in some cases. Therefore, Socket.IO is the best way to implement bidirectional communication between a browser and Node.js server.
Setting up your project
Before we start learning about the Socket.IO API, let’s first set up our project directory and files. Create a directory named SocketIO-Example. Inside the directory, create files called package.json, app.js, and socket.js, and a directory called public. Inside the public directory, create two directories, html and
js. Inside the html directory, create a file called index.html. Finally, in the js directory, download and place the Socket.IO library from https://cdn.socket.io/ socket.io-1.3.7.js. At the time of writing, the latest version of Socket.IO is 1.3.7; therefore, we will be using that version.
Inside the app.js file, we will write code for the web server, and inside the socket. js file, we will write code for the Socket.IO server. For now, we will run two different servers, that is, a separate web server serving the website, and another server for bidirectional communication. In the next article, we will learn how to integrate the Socket.IO server with the Express server.
Inside the package.json file, place this code:
{
“name”: “SocketIO-Example”, “dependencies”: {
“express”: “4.13.3”,
“socket.io”: “1.3.7”
}
}
Now, run the npm install command inside the SocketIO-Example directory in order to download and install Express and the Socket.IO Node.js library.
Now, inside the index.html file, place this HTML code:
<!doctype html>
<html>
<head>
<title>SocketIO-Example</title>
</head>
<body>
<script src=”js/socket.io-1.3.7.js”></script>
<script>
//place JavaScript code here
</script>
</body>
</html>
Inside the second <script> tag, you will be placing the Socket.IO client-side code. Now, place this code in the app.js file to serve the index.html file:
var express = require(“express”); var app = express();
app.use(express.static( dirname + “/public”)); app.get(“/”, function(httpRequest, httpResponse, next){
httpResponse.sendFile( dirname + “/public/html/index.html”);
})
app.listen(8080);
Here, we are listening on port 8080. Run the app.js file and visit the
http://localhost:8080/ URL to load the index.html page.
We are done with setting up the files and directories. Now, let’s learn about the Socket.IO client-side and server-side APIs.
Diving into the Socket.IO API
Let’s first look at an overview of the Socket.IO API. After that, we will get into the advanced features one by one.
Let’s first build a Socket.IO server. The following is the code to create a Socket.IO server instance and listen to new Socket.IO client handshake requests. Place it in the socket.js file:
var Server = require(“socket.io”);
var io = new Server({path: “/websocket”}); io.listen(3000);
Here is how the code works:
- First, we import the Socket.IO Node.js library.
- Then, we create a new instance of the Socket.IO server using the Server constructor.
- Then, while creating a new instance, we pass the HTTP path to which the Socket.IO client will make a handshake request. If we don’t pass the path, it defaults to /socket.io
- Finally, we listen on port 3000.
I created a single Socket.IO server in the code, but we have the freedom to create multiple servers listening on different ports.
Now, Socket.IO clients can send a handshake request, and the Socket.IO server can establish a Socket.IO connection with its clients. Let’s write some code to do something on a Socket.IO server after a Socket.IO connection has been established. Place this code in the socket.js file:
io.on(“connection”, function(socket){ socket.send(“Hi, from server”);
socket.on(“message”, function(message){ console.log(message);
});
socket.on(“disconnect”, function(){ console.log(“User Disconnected”);
});
socket.emit(“custom-event”, “parameter1”, “parameter2”); socket.on(“custom-event”, function (parameter1, parameter2) {
console.log(parameter1, parameter2);
});
});
Let’s see how this code works and what the send(), on(), and emit() methods do:
- The on() method of the io object is used to attach event handlers to events triggered on the Socket.IO server by itself.
- We first attach an event handler for the connection event. As soon as a Socket.IO connection has been established, the connection event is fired. The event handler has a single parameter, which is an object representing the Socket.IO client. Here, we’ve named the parameter socket.
- The on() method of the socket object is used to attach event handlers to the events emitted by the Socket.IO client to the server.
- The send() method of the socket object is used to send a message to the Socket.IO client. We are sending a string here, but you can also send an instance of ArrayBuffer, Blob Node.js Buffer, and even File. You can also send a simple JavaScript object.
- Then, we attached an event handler for the message event, which is triggered when the Socket.IO client sends a message to the Socket.IO server.
- After that, we attached an event handler to the disconnect event, which is triggered when the Socket.IO client disconnects from the Socket.IO server.
- The emit method of the socket object is used to send custom events to the Socket.IO client. It can take an infinite number of arguments. The first argument it takes is the event name, and the rest of the arguments are the
parameters of the event handler, which is triggered on the Socket.IO client.
- Finally, we use the on() method of the socket object to register an event handler for a custom event named custom-event.
So now, we have finished creating a very simple Socket.IO server that lets Socket.IO clients establish a connection with it. It is also listening to message and custom-event events. It also sends a message and emits a custom event to the Socket.IO clients as soon as they are connected.
You can now run the Socket.IO server using the node socket.js command.
Now, let’s build the Socket.IO client. The following is the code to create a Socket.IO client instance and establish a Socket.IO connection with the Socker.IO server. Place this code in the <script> tag of the index.html file:
var socket = io(“http://localhost:3000”, {path: “/websocket”});
Here, we are first creating a Socket.IO client instance and establishing a connection with the Socket.IO server using the io constructor. The first argument is the base URL of the Socket.IO server. The second argument is an optional object to which we have passed the URL path that the handshake request should be made to. If we don’t pass the path, then the default path will be /socket.io.
We created a single Socket.IO client instance here, but we have the freedom to create multiple Socket.IO client instances if we want to connect to multiple Socket. IO servers.
We are using the http scheme instead of the ws scheme here because Socket.IO can use any technique or protocol other than WebSocket to achieve bidirectional communication. If Socket.IO chooses to use WebSocket, then it will automatically replace http with ws.
Let’s write some code to do something on a Socket.IO client after a Socket.IO connection has been established.
Place this code in the <script> tag of index.html file:
socket.on(“connect”, function () { socket.send(“Hi, from client”);
socket.on(“message”, function (msg) { console.log(msg)
});
socket.on(“disconnect”, function(){ console.log(“I am disconnected”);
});
socket.on(“custom-event”, function (parameter1, parameter2) { console.log(parameter1, parameter2);
});
socket.emit(“custom-event”, “parameter1”, “parameter2”);
});
Let’s understand how this code works and what the send(), on(), and emit()methods do:
- The on() method of the socket object is used to attach event handlers to the events triggered on the Socket.IO client by itself.
- We first attach an event handler to the connect event. As soon as a Socket.IO connection has been established, the connect event is fired.
- The send() method’s socket object is used to send a message to the Socket.IO server. We are sending a string here, but you can also send an instance of ArrayBuffer, Blob, or even File. You can also send
a simple JavaScript object.
- Then, we attached an event handler to the message event, which is triggered when the Socket.IO server sends a message to the Socket.IO client.
- We then attached an event handler to the disconnect event, which is triggered when the Socket.IO client disconnects from the Socket.IO server. As soon as a Socket.IO connection breaks, the Socket.IO client keeps trying to connect again automatically.
- After that, we use the on() method of the socket object to register an event handler for a custom event named custom-event.
- The emit method of the socket object is used to send custom events to the Socket.IO server. It can take an infinite number of arguments. The first argument it takes is the event name, and the rest of the arguments are the parameters of the event handler, which is triggered in the Socket.IO client.
Now, open the URL http://localhost:8080/ in your browser, and you should see the following console output:
Hi, from server parameter1 parameter2
And you will see the following output in the shell running the Socket.IO server:
Hi, from client parameter1 parameter2
Restricting connections based on origin
By default, a Socket.IO server lets Socket.IO clients from any origin establish a Socket.IO connection with it. Socket.IO provides a way to restrict connections to a particular origin.
To restrict connections to a particular origin or set of origins, we can use the origins method of the Server instance.
Place this code in the socket.js file to only allow Socket.IO clients running on the
localhost domain and port number 8080 to connect to the Socket.IO server:
io.origins(“localhost:8080”);
We cannot simply pass any origin to the origins method. Here are examples of some valid origins:
- testsite.com:80
- http://testsite.com:80
- http://*:8080 (* is a wildcard)
- *:8080
- testsite.com:* http://someotherdomain.com:8080 (multiple origins separated by spaces)
- testsite.com:*/somepath (Socket.IO will ignore /somepath)
- *:*
In the previous list, every origin has a port number associated with it because it is compulsory to provide a port number or * in place of the port number, indicating any port.
Here are some examples of invalid origins:
- testsite.com
- http://testsite.com
- http://testsite.com/somepath
These are invalid because they don’t have port numbers associated with them. Also note that if you specify sub.testsite.com as the origins value,
testsite.com will be a valid origin.
Namespaces in Socket.IO
A Socket.IO server is actually divided into child servers called namespaces. A Socket.IO client always connects to a namespace. Every namespace has a name, which looks like an HTTP path.
In the previous code, when we created a Socket.IO server, a default namespace was created. The default namespace is identified by the / path. If we don’t mention a namespace when creating a Socket.IO client, then it connects to the default namespace. So, the connection event is specific to a particular namespace, that is, for every namespace, we have to register a different connection event handler.
Here is how to create a custom namespace. Place this code in the socket.js file:
var nsp = io.of(“/custom-namespace”);
nsp.on(“connection”, function(socket){ socket.send(“Hi, from custom-namespace”);
socket.on(“message”, function(message){ console.log(message);
});
socket.on(“disconnect”, function(){ console.log(“User Disconnected”);
});
socket.on(“custom-event”, function (parameter1, parameter2) { console.log(parameter1, parameter2);
});
socket.emit(“custom-event”, “parameter1”, “parameter2”);
});
On adding this code to the socket.js file, we will have two namespaces, that is, the default one, which we created earlier, and this one, called /custom-namespace.
Here, you can see that we registered a new connection event handler for this namespace.
Now, let’s create another Socket.IO client, one which connects to the /custom- namespace namespace. Place this code in the <script> tag of index.html file:
var socket1 = io(“http://localhost:3000/custom-namespace”, {path: “/websocket”});
socket1.on(“connect”, function () { socket1.send(“Hi, from client”); socket1.on(“message”, function (msg) {
console.log(msg)
});
socket1.on(“disconnect”, function(){ console.log(“I am disconnected”);
});
socket1.on(“custom-event”, function (parameter1, parameter2) { console.log(parameter1, parameter2);
});
socket1.emit(“custom-event”, “parameter1”, “parameter2”);
});
Here, we are creating another Socket.IO client; this one connects to the /custom-namespace namespace.
Now, rerun the socket.js file and visit http://localhost:8080/. This will be the browser console output:
Hi, from server parameter1 parameter2
Hi, from custom-namespace parameter1 parameter2
And this will be the new shell output:
Hi, from client parameter1 parameter2 Hi, from client parameter1 parameter2
Referring to all connected Socket.IO clients
The Socket.IO server API also provides us with a way of sending a message or custom event to everyone in a namespace.
Let’s look at an example of how to do this. Place the following code in the socket. js file:
setInterval(function(){
//sending message and custom-event-2 to all clients of default namespace
io.emit(“custom-event-2”); io.send(“Hello Everyone. What’s up!!!”);
//sending message and custom-event-2 to all clients of /custom- namespace namespace
nsp.emit(“custom-event-2”); nsp.send(“Hello Everyone. What’s up!!!”);
}, 5000)
Here, to send a message or custom event to all the Socket.IO clients connected to the default namespace, we use the io object. And to send to Socker.IO clients connected to a custom namespace, we use the object returned by the of() method.
Here, we are simply sending a message and custom event to everyone in both the namespaces every 5 seconds.
Rooms in Socket.IO
A room simply represents a group of Socket.IO clients connected to a particular namespace. A room belongs to a particular namespace.
A namespace cannot have two rooms with the same name, but two different namespaces can have rooms with the same name. Rooms with the same name on different namespaces are different rooms entirely.
Every Socket.IO client connected to a namespace must belong to one or more groups. By default, when a Socket.IO client is connected, a new group is created and the client is added to it. Therefore, every Socket.IO client belongs to a unique group by default.
Here is the code that prints the unique group name of a Socket.IO client after it has connected. Place it inside the default and /custom-namespace namespaces’ connection event handlers:
console.log(socket.id);
The id property of the socket object holds the unique room name.
Joining and leaving a room
To add a Socket.IO client to a custom room, we need to use the socket.use() method. To remove a Socket.IO client from a custom room, we need to use the socket.leave() method.
The following code adds every Socket.IO client connected to the default and
/custom-namespace servers to a room called my-custom-room. Place it inside the default and /custom-namespace namespaces’ connection event handlers:
socket.join(“my-custom-room”);
Similarly, to remove a user from my-custom-room, you can use this code:
socket.leave(“my-custom-room”);
Referring to all connected Socket.IO clients in a room
The Socket.IO server API also provides us with a way to send a message or custom event to everyone in a room.
Let’s look at an example of how to do this. Place the following code in the socket.js file:
setInterval(function(){
//sending message and custom-event-3 to all clients in my- custom-room room of default namespace
io.to(“my-custom-room”).send(“Hello to everyone in this group”); io.to(“my-custom-room”).emit(“custom-event-3”);
//sending message and custom-event-3 to all clients in my- custom-room room of /custom-namespace namespace
nsp.to(“my-custom-room”).send(“Hello to everyone in this group”);
nsp.to(“my-custom-room”).emit(“custom-event-3”);
}, 5000)
Here, to send a message or custom event to all the Socket.IO clients in the my- custom-room room of the default namespace, we need to use the io.to().send() method. And to send a message or custom event to all the Socket.IO clients in the my-custom-room room of the /custom-namespace namespace, we need to use the nsp.to().send() method.
Broadcasting messages and custom events to namespaces and rooms
Broadcasting is a feature of the Socket.IO server API that lets a socket object send a message or custom event to everyone in the namespace or room except itself.
Broadcasting to a namespace
To broadcast a message to all Socket.IO clients in a namespace, we need to use the socket.broadcast.send() method, and to broadcast a custom event, we need to use the socket.broadcast.emit() method.
Let’s look at an example. Place the following code in the connection event handler of the default namespace to broadcast a message every time a new Socket.IO
client joins:
socket.broadcast.send(“A new user have joined”);
Now, open http://localhost:8080/ in two different tabs. In the first tab’s console,
you will see this output:
Hi, from server parameter1 parameter2
Hi, from custom-namespace parameter1 parameter2
A new user have joined
In the second tab’s console, you will see this output:
Hi, from server parameter1 parameter2
Hi, from custom-namespace parameter1 parameter2
Broadcasting to a room
To broadcast a message to all Socket.IO clients in a room, we need to use the socket.broadcast.to().send() method, and to broadcast a custom event, we need to use the socket.broadcast.to.emit() method.
Place this code inside the default and /custom-namespace namespaces’ connection
event handlers:
socket.broadcast.to(“my-custom-room”).send(“Hi everyone. I just joined this group”);
Here, as soon as a Socket.IO client is connected, it sends a message to everyone else in the room.
Middleware in Socket.IO
Middleware in Socket.IO server is a callback that’s executed when a Socket.IO client makes a handshake request, before the Socket.IO server replies to it. Middleware allows us to allow or reject handshakes.
The middleware concept of Socket.IO is similar to that of Express, but the difference is that the middleware doesn’t get access to the HTTP response object; also, the parameter signature is different. Therefore, Express middleware cannot be used in Socket.IO.
An instance of middleware is attached to a specific namespace. Here is a basic example that demonstrates how to register a middleware instance with all namespaces. Place this code in the Socket.IO file:
io.use(function(socket, next) {
//request object
//socket.request
//to reject
//next(new Error(“Reason for reject”));
//to continue next();
});
Here, we can see that we need to use the io.use() method to register a middleware instance with all namespaces. To attach middleware to the /custom-namespace namespace, we can use the nsp.use() method.
Disconnecting manually
You can also manually disconnect a Socket.IO connection. To disconnect from the client side, you need to use the disconnect() method of the io instance. To
disconnect from the server side, you need to use the socket.disconnect() method.
Summary
In this article, we learned the fundamentals of the WebSocket protocol. We learned about its relationship with HTTP and how it behaves with proxies, load balancers, and firewalls. Then, we jumped into the Socket.IO library, which primarily uses WebSocket to achieve bidirectional full-duplex communication in real time. You should be comfortable with implementing bidirectional communication between a browser and a Node.js server.
In the next article, we will build a real-world application using Socket.IO. You will learn more advanced things, such as integrating a Socket.IO server with an Express server and checking authentication before connecting to a WebSocket server.
Here are related articles if you wish to learn more advance topics for web development:
Best practices for securing and scaling Node.JS applications
Comprehensive overview of Angular 2 architecture and features
How Bootstrap 4 extensible content containers or Cards work
Comprehensive guide for migration from monolithic to microservices architecture
Comprehensive overview of Bootstrap 4 features for user interface customizations
Intro to functional reactive programming for advance js web development
Using advance js and webRTC for cross browser communications in real time
Junior or senior web developers can also explore career opportunities around blockchain development by reading below articles:
Blockchain Developer Guide- Comprehensive Blockchain Ethereum Developer Guide from Beginner to Advance Level
Blockchain Developer Guide- Comprehensive Blockchain Hyperledger Developer Guide from Beginner to Advance Level